
 +995 551 50 18 84




Receiving the keys is not the end of the transaction, but the point at which you assume responsibility for the condition of the flat. Signing the handover certificate without noting any visible defects may subsequently make it difficult to prove when a particular defect arose. The nature and extent of the buyer’s claims after handover depend on the nature of the defect, the terms of the contract and the applicable legislation; however, it is considerably easier to prove that a problem existed before you moved in if it was recorded before the handover certificate was signed. This is precisely why inspecting the property before signing the handover certificate is not a mere formality or an excuse to nit-pick over trifles, but a thorough comparison of the actual condition of the premises with what is specified in your contract.
In brief: Before signing the documents, check that the flat matches the contract and the floor plan; inspect the walls, floor, windows, doors, electrical installations, water supply, drainage, ventilation, meters and any fitted fixtures and fittings. Take photographs of any defects you find and record them in writing. Separately, clarify the status of the building’s commissioning and the procedure for registering ownership. In the event of serious defects or a dispute with the developer, do not attempt to assess the consequences on your own — check the contract and, if necessary, consult an engineer or a Georgian lawyer.
The flat may look finished at first glance: the walls have been whitewashed, the windows are fitted, and the lighting works. But a proper inspection goes beyond just the finish. You need to ensure that the building services are operational, that the building’s communal areas are actually accessible, and that the condition of the building itself is suitable for handover to the buyers. The handover of the flat and the commissioning of the entire building are separate processes, and this is discussed in more detail below.
This article provides a step-by-step practical guide: what to find out before your visit, which documents to have to hand, what to look out for on the premises, and how to record your observations correctly.
Check-in in 5 minutes: procedure
| Stage | What to do | Result |
|---|---|---|
| 1. Before your visit | Review the contract, annexes, floor plan and specifications | Do you understand exactly what the developer is required to hand over? |
| 2. Check the documents | Check the status of the building’s commissioning and the registered details of the property | The legal status of the house is clear prior to signing |
| 3. View the flat | Check the layout, walls, floor, windows, doors, balcony and finishes | Visible defects have been identified |
| 4. Check the building services | Electrical installations, water supply, drainage, ventilation, meters, and the specified equipment | Functional shortcomings have been identified |
| 5. Take a look around the communal areas | The lift, corridors, entrance area and the planned infrastructure | It wasn’t just the flat that was checked |
| 6. Record any defects | Take a photo and add comments to a written document | There is evidence of the condition of the flat |
| 7. Set out the procedure | Proceeding in accordance with the contract: a report with comments, a separate list of defects, a re-inspection or another agreed course of action | It is clear what happens once the shortcomings have been identified |
| 8. Obtain the documents | Keep copies of signed documents, photographs and correspondence | The buyer retains a set of receipts |
The main principle is this: first, check that the property matches the contract and record its condition, and only then sign the documents in accordance with the procedure set out in your transaction.
What to check before acceptance
Before you set off for the site, open the contract. Not a promotional leaflet, nor correspondence with the manager — specifically the signed contract and all its annexes. It is these documents, first and foremost, that set out the condition, specifications and timeframe within which the developer is obliged to hand over the property to you.
The following points must be clarified from the contract and its annexes:
- the exact stated area flats and the terms for recalculation should the actual floor area turn out to be different;
- layout — the layout of the rooms, the positioning of partitions, and the locations of windows and doorways;
- list of works — what is included in the handover: the structure only, basic finishing, or a full refurbishment;
- specifications — the presence of plumbing fixtures, an electrical distribution board, meters, radiators and air-conditioning units, where provided for;
- specification of materials, if it forms part of the contract or an annex thereto;
- procedure for transferring an asset — how comments are recorded, within what timeframe the developer is required to respond, and what the procedure is for a re-inspection.
Do not rely on promotional images and verbal promises instead of the written terms of the transaction. It is best to set out the key features of the flat, the specifications and the developer’s obligations directly in the contract and its annexes; the legal significance of advertising, correspondence and other statements depends on the specific circumstances.
The contract and its annexes are the primary source of the developer’s specific obligations regarding the specifications, floor area, finish and the procedure for handover. However, the purchaser’s rights may also arise from legislation and other legally relevant documents and circumstances. Take a printed copy or a digital copy of the contract and all its annexes with you to the property.
The contract and its annexes form the basis for making specific demands of the developer. Anything not set out in the signed documents will require further justification.
For buyers who purchased a property whilst it was still at the foundation stage, it is also important to understand exactly who the developer is and what their reputation is in terms of meeting deadlines and ensuring quality. This can be done in advance — “How to check a property developer in Georgia“.
Documents and the status of the house
This is one of the key issues that buyers often confuse with the technical handover of a flat.
Technical handover of the flat by the buyer — this involves you carrying out a personal inspection of the premises and signing the handover certificate. You check that the actual condition of the premises complies with the terms of the contract.
Commissioning of the building — this is a separate procedure laid down by law, following which a certificate of commissioning is issued for the buildings in question. According to The Georgian Code on Spatial Planning, Architecture and Construction (Article 139¹), the building may not be put into use until the commissioning certificate required by law has been issued. However, Class I buildings are not subject to being recognised as fit for commissioning in the same manner; the rules for Class II–IV buildings are determined by a government decree. This is directly linked to the possibility of lawful operation of the building; The Code also imposes certain restrictions on the supply of electricity and natural gas to a building that has not been commissioned, except in cases provided for by law relating to construction works. If a building has not formally been commissioned, this is an important issue that must be clarified before the certificate is signed.
The administrative commissioning of a building is a government procedure which does not replace the technical handover of a specific flat to the buyer, nor does it constitute a government guarantee of the quality of each flat.
Registration of ownership — a separate process. Ownership of property is acquired by registering the relevant right in the Public Register on the basis of a duly executed transaction. Exactly when the parties submit the documents for registration, and whether a deed of transfer must be signed or payments settled beforehand, depends on the terms of the specific contract and the structure of the transaction — please clarify this procedure with the developer or a solicitor in advance.
Before viewing the property, check with the developer to confirm the building’s status. Also check whether there are any registered encumbrances on the property or the land. You can check the registered details of the property — rights, public law restrictions, tax liens and mortgages — via an extract from The National Agency for the Public Register of Georgia (NAPR): it is this department that maintains the registers of property rights and associated encumbrances.
For more details on the registration process, see the article ‘How real estate registration takes place in Georgia: real terms and pitfalls“.
The procedures for issuing planning permission and for the commissioning of buildings are governed by a separate regulatory act — Decree No. 255 of the Government of Georgia, which is subject to ongoing updates; where necessary, please refer to the latest consolidated version on Matsne. If you have any doubts regarding the status of a specific property, it is advisable to request the relevant documentation from the developer or seek independent legal advice.
Table 1: What to check before the roadworthiness test
| What to check | Where to look | What to compare | What should raise concerns |
|---|---|---|---|
| Contract and date of transfer | The original contract | Consistency with the actual date of transfer | Delay without written notice |
| Appendices and layout | Annexes to the contract | Actual layout of the premises | Missing attachments or discrepancies in the layout |
| Declared area | Contract, technical certificate | On-site measurement results | A significant discrepancy without a recalculation mechanism |
| Status upon transfer | Contract and Specification | Actual appearance and specifications | The finish or specification does not comply with the contract |
| Building completion status | Information from the developer | Existence of a commissioning certificate | The building has not yet been commissioned, but the handover has already been scheduled |
| Registered details | Extract from the public register (NAPR) | Property details, encumbrances, pledges and mortgages | Encumbrances, seizures, data discrepancies |
| Procedure for recording comments | Contract | Procedure for compiling a list of defects | Absence of a procedure or vague wording |
| Contents | Contract, specification | The availability of all the equipment listed | Absence of meters, plumbing fixtures and items specified in the contract |
New buildings in Georgia


 Batumi, Airport area
 from 27.2m²





What to bring for a self-inspection
| Tool | Why is it needed? | For a beginner |
|---|---|---|
| Smartphone | Photos and videos of defects | Yes |
| The Agreement and Annexes | Check that the item matches the promised specifications | Obligatory |
| Roulette | Reference dimensions | Yes |
| Spirit level | Preliminary inspection of surfaces | It is advisable |
| Torch | Inspection of dark areas, corners and recesses | Yes |
| Charger / simple socket tester | Checking which sockets are available | It is advisable |
| A napkin or a sheet of paper | Preliminary air flow check | Yes |
| Painter’s tape | Record any defects found | It is advisable |
| Laser rangefinder | More convenient verification measurements | Optional |
| Thermal imager | Search for temperature anomalies | Best left to a specialist |
| Moisture meter | Instrumental testing of material moisture content | Best left to a specialist |
| Multimeters and other electrical measuring equipment | Professional electrical inspection | For professionals only |
Do not open electrical panels yourself, and do not tamper with the wiring or gas equipment. A visual inspection of the switchboard from the outside is the most that is appropriate during a self-inspection.
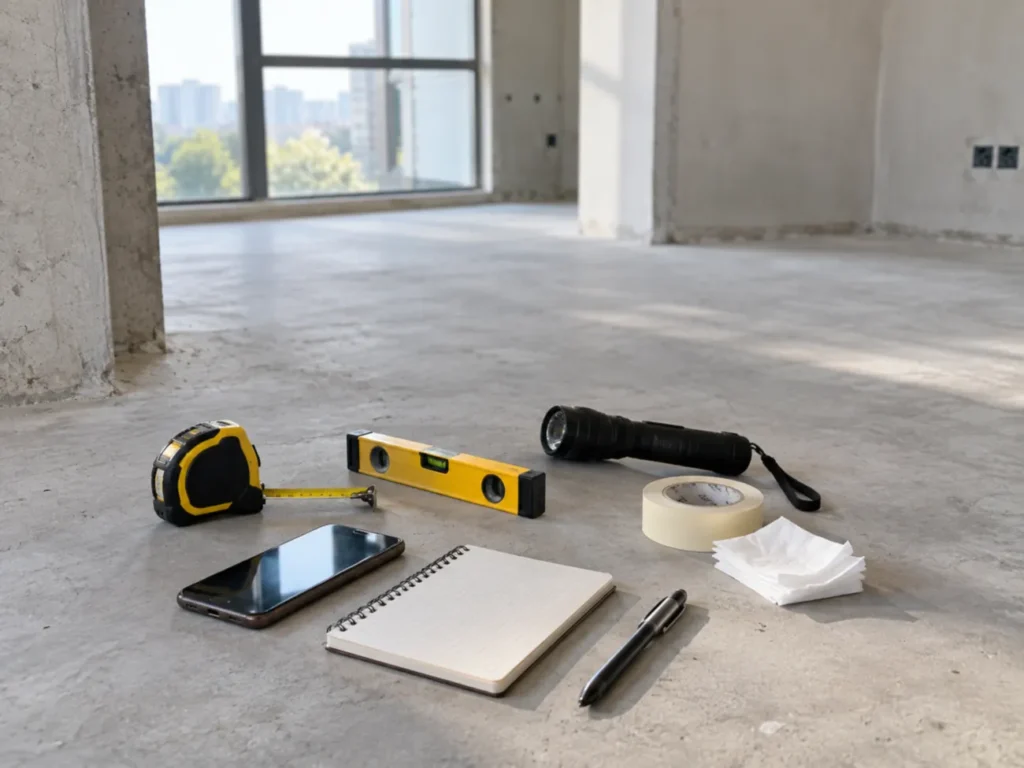
Plan your visit for daylight hours. Good natural light is your best tool for spotting unevenness, signs of damp and surface defects. An evening inspection under artificial light often does not allow one to notice the thing that immediately catches the eye in daylight.
How the flat handover works: a step-by-step guide
Step 1. Don’t start by signing the documents. First, ask to be shown round the flat and carry out an inspection in accordance with the procedure set out in your contract.
Step 2. Carry out a general inspection. Check the flat number, floor, layout, number of rooms, balconies and any features specified in the contract.
Step 3. Walk around the flat in one direction. For example: front door → hall → bathroom → kitchen → bedrooms → balcony. This reduces the likelihood of missing a room.
Step 4. Check from top to bottom. In each area: ceiling → walls → windows/doors → sockets and fittings → floor.
Step 5. Check that everything is working properly. It is not enough simply to look at a socket, tap or window — you need to try using the items that can be safely checked in the home.
Step 6. Take photographs of any defects straight away. Don’t expect to be able to draw up a list from memory after the inspection.
Step 7. Check the final list with the developer’s representative. Each comment must have a clear description and a designated place.
Step 8. Determine the next steps under the contract. This may involve recording the comments in the report, drawing up a separate list of defects, carrying out a re-inspection, or any other option provided for in the contract.
Step 9. Collect copies of the signed documents. Do not leave the only copy of the list of comments with the developer’s representative.
Flat inspection checklist

Layout and floor area
Start by carrying out a general inspection and checking that the layout of the rooms matches the plan in the contract. Check the position of partitions, doorways and window openings. If the contract specifies a balcony, it must be present. If the appendix indicates a storage room, check that it is there.
Take a few check measurements with a tape measure — the length and width of at least two rooms. It is difficult to measure the exact floor area accurately at the handover stage without specialist equipment, but any obvious discrepancies (for example, a room that is noticeably smaller than it should be according to the plans) should be noted. If your contract contains provisions for a price adjustment in the event of a discrepancy in floor area, check whether a professional survey is provided for and what the procedure is for carrying it out.
Do not automatically classify any numerical discrepancy as permissible or impermissible — this is determined by the terms of your specific contract, not by an abstract standard.
Walls, floor and ceiling
Inspect the surfaces in side lighting — this helps you spot waves, dimples and uneven areas that are not visible under direct lighting. Walk across the floor, listening out for any creaking or ‘squeaky’ sections of the screed.
What to look out for:
- cracks — Fine shrinkage cracks in plaster are common and may not be a cause for concern, but wide cracks or those running diagonally in load-bearing structures require professional assessment;
- signs of damp and discolouration — particularly in corners, near windows, on the ceilings of the upper floors and along external walls;
- possible voids beneath the screed — tap the floor with the heel of your shoe or the handle of a screwdriver: a hollow or noticeably different sound in certain places may indicate an area where the screed does not have sufficient adhesion to the subfloor; it is best to mark such areas for further professional inspection;
- unfinished sections — unfilled areas, unfinished joints, and formwork marks on the concrete in prefabricated flats;
- quality of the screed — Visually, it should be smooth, with no obvious cracks, dents or crumbling edges.
Distinguish between a cosmetic flaw and a potentially serious defect. A scratch on the plaster is one thing. A crack extending into the floor slab is quite another. If you have even the slightest suspicion of a structural problem, take a photograph of it and consult an independent technical expert – do not attempt to diagnose load-bearing structures yourself.
Windows, doors and balcony
Every window must be opened and closed. Please check:
- smooth operation of the sash and all modes of operation (tilt and turn);
- seals around the perimeter — these must not be torn or peeling;
- condition of the double-glazed unit — cracks, condensation between the panes (indicating a breach in the seal), chips along the edges;
- where the window unit meets the opening — visually check for any obvious unfinished areas, open gaps or signs of moisture ingress; if in doubt, it is best to assess the quality of the installation and the seal using appropriate tools;
- water marks or discolouration on the window sills and the window ledge.
Also check the front door when it is open and closed. It should close tightly without any effort, and the lock should operate smoothly without jamming. The seals around the perimeter of the door frame must be in place.
On the balcony, check the drainage – ensure the floor slopes towards the drain and that the drain itself is clear. If the floor does not slope sufficiently, this can lead to water accumulating and increase the risk of leaks. Inspect the joint between the balcony slab and the building wall: this is one of the areas where water marks appear if the waterproofing is of poor quality. Visually inspect the parapets and railings and, without applying excessive force, check for any obvious instability. If you have any doubts, do not carry out load tests yourself.
Building services
Check this as part of a routine household inspection.
Electrical systems. If there is electricity in the flat, test each socket using a tester or a charger. Switch on each circuit breaker. Visually inspect the fuse box from the outside: all circuit breakers must be in place, with no signs of burning or melting. Check that the number of circuits matches that specified in the documents.
Water supply and sewerage. Turn on the hot and cold water taps. The water pressure and colour may vary at the time of handover, but if no water comes out at all, this is a reason to find out why. Check the areas under the washbasin and in the bathroom: look for any signs of leaks; the sealant around the pipework connections should be applied neatly and without any gaps. Check the drains in the washbasin and shower manually.
Ventilation. Hold a tissue up to the vent – this simple indicative test shows whether there is an air flow and in which direction it is travelling. It does not measure the system’s performance and is no substitute for professional measurements, but a complete lack of air movement is a cause for concern.
Heating and air conditioning. If radiators or air-conditioning units are specified in the contract, ensure they are present and carry out a visual inspection to check for any mechanical damage. It will not be possible to fully test the heating system outside the heating season, but you should note that the equipment is present and that there is no visible damage.
Meters. Check that any meters are in place, if required. Make a note of the opening readings — this is important for subsequent calculations.
Communal areas of the building
Please also inspect the communal areas and the building’s infrastructure, which are located outside the flat and may form part of the owners’ common property or be specified in the building’s plans and contractual documents:
- corridors and stairwells — lighting, finishes, cleanliness, and the sense of completion;
- lifts — presence and functionality, where applicable;
- entrance area — intercom, letterboxes, lighting;
- car park, lobby, courtyard — compliance with the specified infrastructure.
If any items mentioned in the contract or project documentation are actually missing or not ready, please note this as a comment.
Table 2: Flat handover checklist
| Zone | What to check | How to check | A possible indication of a problem |
|---|---|---|---|
| Layout | Compliance of the configuration with the plan | Compare with the annex to the contract | No partition walls, balcony or doorways as per the plans |
| Area | Room measurements | Roulette | A clear discrepancy from the planned dimensions |
| Walls | Levelness, cracks, signs of damp | Visually, in side lighting, the level | Diagonal cracks, dark patches, damp patches |
| Floor (screed) | Flatness, any voids or cracks | Walk around, knock, level | A hollow sound when tapped, visible cracks, crumbling edges |
| Ceiling | Signs of damp, unfinished sections | Visually, the torch | Dark patches, spots, untreated areas |
| Windows | Opening/closing, seals, double glazing | Manual inspection | Stuck windows, gaps, misted-up double-glazed windows, water marks on the window sills |
| Front door | Closure, lock, seal | Manually | Warping, a lock that won’t close, gaps |
| Balcony | Water drainage, wall junctions, fencing | Check the gradient visually | Traces of water, sealant peeling away, no slope towards the drain |
| Electrical systems | Sockets, switches, fuse box | Tester, charger | Sockets that do not work, burn marks in the fuse box |
| Water supply | Water pressure, water colour, taps | Turn on all the taps | No water, signs of a leak under the washbasin |
| Sewerage | Sink, shower and toilet drains | Turn on the tap, check the drain | Slow drainage, a smell, signs of damp |
| Ventilation | The presence of airflow in ventilation ducts | A napkin by the opening (approximately) | A complete lack of air movement |
| Heating | Presence and condition of radiators | Visually, the contract | Absence of radiators as specified in the contract; mechanical damage |
| Meters | Availability, indications | Visually, record the readings | There are no meters; the seals have been broken |
| Finishing | Compliance with the specification | Compare with the contract | Other material; no specific coating is specified |
| Communal areas | Lift, corridors, lighting, entrance area | Visual and functional checks | A lift that is out of order; a lack of the infrastructure provided for in the contract |
| Contents | Everything as per the contract | List from the contract | Absence of sanitary fittings and equipment as specified in the specifications |
Printable checklist for accepting an apartment in Georgia
Are you getting ready for the handover? We’ve put together a handy checklist that you can easily view on your mobile or print out. Tick off the items as you go through the inspection, make a note of any faults you find, and link them to photos.
Download the PDF flat handover checklist Ru
Download the PDF flat handover checklist En
A shell or a fully refurbished property
The scope of the handover depends entirely on the condition in which the contract obliges the developer to hand over the property to you. This is specified in the contract — it is this clause, rather than generally accepted market terms, that determines what is to be handed over to you.
For more details on what lies behind the terms ‘black shell’, ‘white shell’ and ‘green shell’ in new-build properties in Georgia, read our separate article: ‘Black, white and green structural frames in new-build properties in Georgia“.
It is important to understand the following: The same term (‘shell’ or ‘turnkey’) can refer to different sets of works in different projects. You should refer only to the list set out in your specific contract and specifications.
Table 3: What to check for different transmission options
| Condition of the flat | The main focus of the acceptance process | What to compare with the contract | Typical risk areas |
|---|---|---|---|
| Black frame | Structural elements: walls, floors, openings, roof | Presence and condition of load-bearing structures; closure of openings | Unfinished sections, cracks in the structure, absence of the required connections |
| White frame | Screed, plaster, utility connections | List of work carried out under the contract | Poor-quality screed, missing connections, uneven plasterwork |
| Green frame | Basic finish, plumbing connections, electrical connections | Specification of Materials and Works | Mismatched materials, unfinished finishes |
| Renovated / Turnkey | All finishes, sanitary ware, fittings and fixtures | Specifications for each item | Other materials, chips, scratches, poor-quality installation, faulty equipment |
When inspecting a bare-frame build, there are fewer opportunities to conceal structural problems — everything is in plain sight. In a fully refurbished property, the number of elements to be inspected is considerably greater, and some defects may be hidden beneath the finishing touches. This is precisely why a refurbished flat requires a particularly thorough inspection.
Projects with a choice of finish (frame)




Highlights of Batumi and the coast
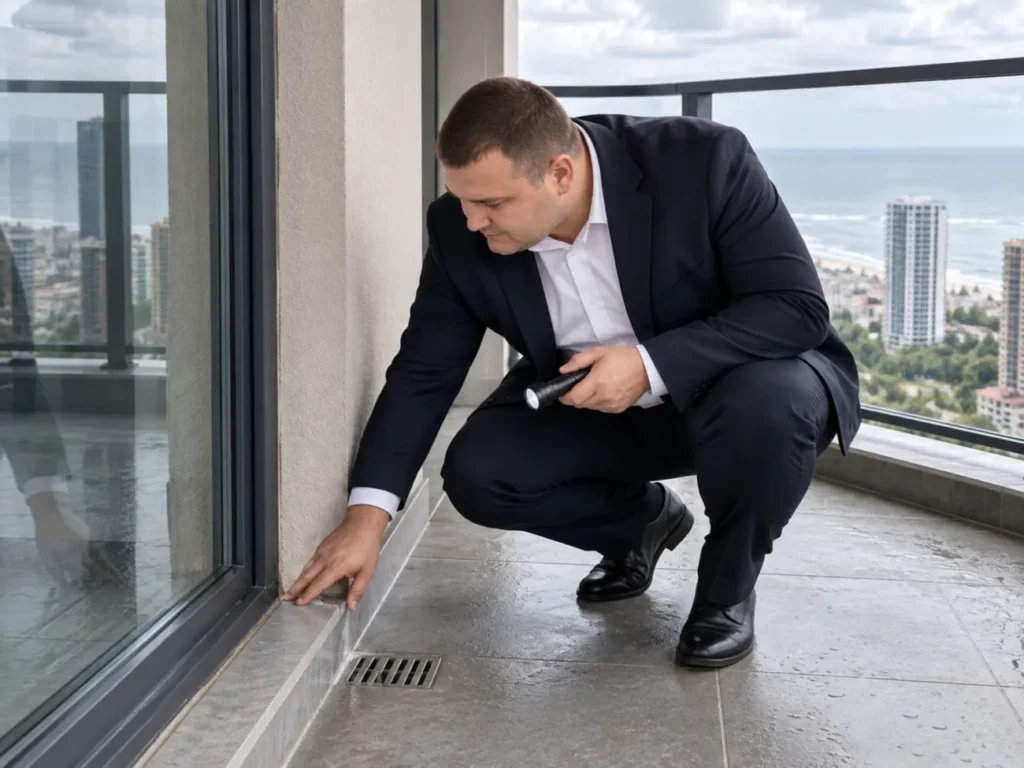
Batumi and other coastal locations — Gonio, Kobuleti, and resort developments along the coast — are characterised by high humidity and significant variations between the seasons. This does not mean that all new-build properties in the area are problematic, but a number of areas warrant closer attention precisely because of the climatic conditions.
Ventilation. In high-humidity conditions, inadequate ventilation quickly leads to condensation, a musty smell and the growth of mould — even in a room that appeared dry at the time of handover. Check the draught in each ventilation duct particularly carefully.
Waterproofing of balconies and roofs. On balconies, check that the joint between the slab and the wall is watertight, inspect the condition of the waterproofing layer (visually), and check that the drainage system is in place and functioning correctly. If the balcony is not covered, it must have a slope towards the drain. A lack of the necessary gradient can lead to water accumulation and increase the risk of leaks in the rooms below.
Window and façade junctions. In coastal projects, the areas where window frames meet the opening, as well as the joints between façade panels or blocks, are potential points of moisture ingress during heavy wind and rain. Inspect the window reveals from the inside: dark streaks, swollen plaster or signs of rust around the frames may indicate a problem.
Signs of damp in the corners. Particular attention should be paid to the external corners, where the ceiling meets the external walls, and the area behind the bath. If, during the inspection, you notice a musty smell or see dark patches, make a note of this and do not rush to sign the document until the situation has been clarified.
Sealing condition. The coastal environment — characterised by high humidity, solar radiation, temperature cycles and exposure to marine aerosols — can accelerate the ageing of certain sealants and components of the façade system; therefore, their condition should be checked particularly carefully. If the flat was completed some time ago but is being handed over late, inspect the sealant around the window frames and on the balcony separately.
Problems with moisture protection in a coastal climate have one unpleasant feature: some of them may go unnoticed during dry periods and only become apparent during heavy rainfall or prolonged periods of high humidity. This is precisely why it is absolutely vital to identify any signs of excessive dampness during the handover stage.
Which defects should not be ignored?
Not every comment carries the same weight. In practical terms, it is more useful to divide shortcomings into three categories – not in legal terms, but according to the extent to which they might affect the comfort and safety of living there.
Cosmetic flaws — a scratch on the door, a chip in the tiling, and some uneven paintwork in one spot. It’s a bit of a nuisance, but it doesn’t affect the use of the flat.
Functional shortcomings — a faulty socket, a jammed lock, a blocked drain, a window sash that isn’t properly adjusted. These issues can be rectified, but they must be noted before signing: once the property has been accepted, it will be considerably more difficult to prove that they were present from the outset.
Potentially serious defects — an active leak, a complete lack of draught, a crack in the load-bearing structure, noticeable dampness or a smell of mould, a significant omission from the agreed specifications, or a clear discrepancy between the layout and the contract. Such observations should be recorded in detail before the documents are signed. The course of action to be taken next — whether to sign the handover certificate with reservations, draw up a separate list of defects, postpone the handover, or adopt another course of action — must be determined in accordance with the terms of the specific contract; in the event of a serious dispute, it is advisable to seek legal advice.
Do not attempt to assess the safety of load-bearing structures yourself. If you are unsure whether there is a crack or deformation, take a photograph and call in an independent technical expert.
Table 4: Fault – possible consequence – action to be taken by the purchaser
| Disadvantage | Why is it important? | What to record | Next step |
|---|---|---|---|
| A scratch on the door / a chip in the tiling | Cosmetic flaw | A close-up photograph and a general view showing the location of the defect | Add to the list of comments |
| A faulty socket or switch | Functional deficiency | Photo/video, room and socket or switch number | Add to the list of comments and clarify the procedure for rectification |
| The window sash is catching on the frame or does not close properly | This may interfere with the normal operation of the window; the cause needs to be investigated | Videos showing opening and closing, indicating a specific sash | Record the comment; if necessary, request an adjustment or a technical inspection |
| Condensation between the panes of a double-glazed window | This may indicate a breach in the double-glazed unit’s seal | A close-up photo and a general view of the window | Put this in writing and request an inspection of the double-glazed unit |
| A visible gap or an incomplete seal around the window frame | May increase the risk of draughts and moisture ingress | A close-up and a wide-angle shot of the window | Note this in the comments; do not determine the cause yourself without a technical inspection |
| Water marks or discolouration on window sills | These may be a sign of moisture ingress, condensation or another problem that requires investigation | Photographs of the stain, the surrounding area and the window as a whole | Record this in writing; if there is significant damp, request a further inspection |
| Signs of damp on the wall or ceiling | There may be a leak, condensation or a problem with the moisture protection | Photos from several angles, the exact location and the approximate size of the area | Record this in writing and investigate the cause before carrying out your own repairs |
| Active leak | May cause further damage to finishes and structures | Photos and videos, location, date and time of discovery | Record this in writing immediately; agree on the next steps under the contract with the developer |
| Mould or a persistent musty smell | This may indicate a long-standing problem with damp or ventilation | Photographs of visible traces, a description of the room and the area where the odour was detected | Record this in writing; if necessary, consult a specialist to determine the cause |
| A complete absence of any noticeable air movement during a preliminary ventilation check | This may indicate that the ventilation system needs to be checked | Video of a napkin test carried out at a specific opening | Record the observation; carry out a professional inspection of the ventilation system if necessary |
| Water isn't draining properly from the sink or shower | There may be a problem with the drain or the sewerage system | Video showing the drain in operation and an indication of the sanitary fitting | Add to the list of comments and request a review |
| A leak under the washbasin or near a plumbing connection | May cause the finish and adjacent structures to become damp | Photos and videos taken whilst the water was running, showing the exact spot where the drops appeared | Record this in writing and request that the issue be rectified/checked |
| The meter specified in the contract is missing | The actual contents may not correspond to the contract | A photograph of the installation site and the relevant clause in the contract or specifications | Include in the comments, referring to the contract |
| The air conditioning, radiator or other equipment specified in the contract is not working | Possible discrepancies in the specified configuration or functionality | Photography/video equipment and the relevant item in the specification | Document in writing and establish a procedure for checking or rectifying the issue |
| A hollow or markedly different sound when tapping specific areas of the screed | May indicate a section requiring further technical inspection | Mark a specific area; take a photo or video with a location tag | Do not attempt to diagnose the condition yourself; if the affected area is extensive or if you have any doubts, consult a specialist |
| Visible cracks in the screed | The nature and significance of cracks may vary | Close-up photos showing scale, location and length | Record; in the event of significant defects, seek a professional assessment |
| A crack in a wall, floor or other structure | It may be either a minor finishing flaw or a sign of a more serious problem | A photo showing the scale, a general view of the structure and the exact location | Do not assess safety yourself; if you suspect a design fault, consult an independent expert |
| Water is pooling on the balcony, or there is no obvious drainage route to the designated drain | May increase the risk of water pooling and leaks | Photos/videos taken after the water appeared, showing the location of the drain and the affected area | Record this in writing and request a technical inspection |
| The balcony railing is noticeably wobbly | A potentially significant security issue | Video without excessive effort, precise location | Do not attempt to carry out repairs yourself; secure the area and notify the developer |
| The actual layout differs from the annex to the contract | Possible non-compliance with the terms of the transaction; in some cases, the issue may go beyond the scope of technical acceptance | A photograph of the actual configuration and the corresponding plan from the contract | Record the discrepancy and examine the contractual and, where necessary, legal consequences |
| The plumbing fixtures, fittings or other items specified in the contract are missing | The item may not correspond to the agreed specification | Photographs of the premises and a list of missing items, with reference to the specification | Include all missing items in the written list of comments |
| A material different from that specified in the specification has been used | Possible non-compliance with the terms of the contract | Photograph of the item and the corresponding item in the specification | Record the discrepancy and request the developer’s position |
| Is the lift out of order, or have the communal areas specified in the contract not been completed? | This may mean that the actual condition of the infrastructure in question differs from that stated in the contractual documents | Photos/videos and a list of missing or non-functional components | Record the current status; check what obligations and deadlines are set out in the contract |
Important: The symptoms listed in the table do not always allow the cause of a fault to be determined independently. For example, a damp patch may be due to a leak, condensation or some other cause, whilst a crack may have different technical implications. During the handover, the buyer’s primary task is to record the observed state, and in the event of a potentially serious problem, to engage an independent technical expert. The procedure for making claims against the developer is set out in the contract and under the relevant legislation.
Haven’t chosen a flat yet?
When choosing a new-build property, it is important to look beyond just the price per square metre. The condition of the property upon handover, the specifications, the developer’s reputation and the stage of completion can all have a significant impact on what you will actually receive after the purchase.
Answer a few questions — and we’ll find suitable properties in Georgia to suit your budget, preferred city and reason for buying.
Find a flat in Georgia
How to record comments
Recording defects is not an emotional letter to the developer, but a practical procedure on which the possibility of having the defects rectified depends.
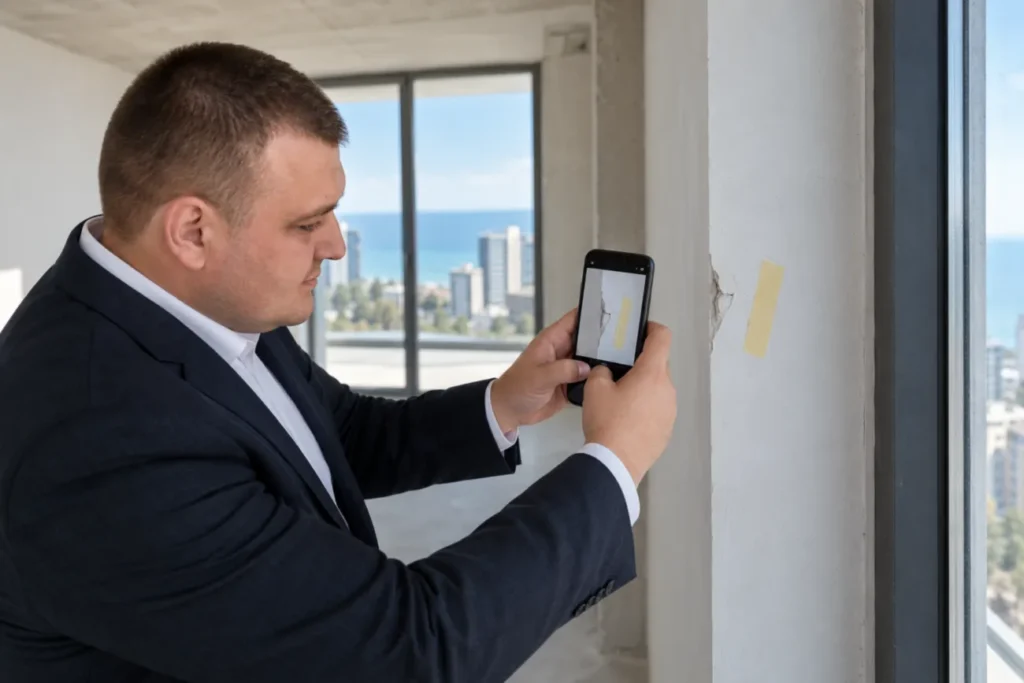
Fixation algorithm:
- General plan — Take a photo of the whole room or area so that it is clear where the fault is.
- Close-up — Photograph the fault itself from as close as possible so that the nature of the problem is clear.
- Marking the spot — Stick some masking tape next to the defect to use as a reference point for the photo.
- Exact textual description — Please specify the room (‘kitchen’, ‘bathroom’), the location (‘bottom left-hand corner by the window’, ‘the second light switch from the entrance’) and the nature of the problem.
- Written record — Include a note in the document to be signed by both parties. This could be a list of defects, a report containing observations, or any other form specified in your contract.
- Keep copies — all signed documents, photographs and correspondence.
- Please agree on the next steps — Check with the developer regarding the timeframe for rectification and the form of confirmation. It is best to set out agreements in writing: verbal promises are much more difficult to use as evidence should a dispute arise.
- Re-examination — Once the issue has been rectified, check each point again.
The more precisely a fault and its location are described, the easier it is to check, upon re-inspection, whether it has been rectified.
The difference between ‘poor walls’ and ‘a crack approximately 20 cm long at a height of 1.2 m from the floor in the left-hand corner of the bedroom (the corner adjoining the balcony)’ is obvious on a follow-up visit. The first description is non-committal and tells us nothing. The second can be verified.
The format and procedure for recording comments must be checked against the specific contract and the applicable requirements. If the contract does not specify a particular format, it is best to agree on the method of recording comments in writing with the developer before the inspection begins, rather than sorting this out during the process.
How to describe a fault: an example
Bad: The window isn’t working properly.
Better: Bedroom, window on the outer wall: when closed, the right-hand sash rubs against the bottom of the frame; the handle requires considerable effort to close. The fault is documented in photos and a video.
Bad: There’s a leak in the bathroom.
Better: Bathroom: after turning on the water, water droplets were found at the connection point of the trap under the washbasin. The photo was taken immediately after the inspection.
For each comment, note down four things:
room → exact location → defect observed → photo/video.
Do not attempt to specify a technical cause yourself unless it has been identified by a specialist. It is better to write ‘a damp patch on the ceiling’ than to claim, without an expert assessment, that ‘the roof’s waterproofing has failed’.
What to check yourself, and what to leave to a specialist
| On your own | If you have experience | Best left to a specialist |
|---|---|---|
| Windows and doors | Verification measurements of premises | Measuring the geometry of a room using precision instruments |
| Visible cracks | Check with a spirit level | Assessment of structural cracks |
| Visible signs of damp | Tapping the screed | Measuring the moisture content of materials |
| Sockets tested with a household tester | Preliminary check of gradients | Diagnostics of electrical wiring |
| Taps and drains | Inspection of accessible service units | Measurement of electrical parameters |
| Ventilation using a tissue | Packing check | Thermal imaging survey |
| Contents | Photographic evidence | A professional assessment of the causes of the defect |
A self-inspection allows you to identify a large number of visible defects. However, it is no substitute for a building survey: the presence of a defect and its cause are not one and the same.
What to do if the developer does not agree with the comment
If the developer’s representative considers the defect you have found to be within acceptable limits, do not attempt to resolve the technical dispute verbally on the spot.
- Document the current condition with photos and videos.
- Please record your comments as neutrally as possible, without attempting to diagnose the cause yourself.
- Please refer to a specific term of the contract or the specifications if the discrepancy relates to them.
- Ask the developer to set out their position in writing.
- Do not rectify the disputed fault yourself until it has been documented.
- If it is a technical issue, consult an independent building expert.
- If the dispute concerns the obligation to remedy a defect, the signing of documents or the consequences of refusing to sign, please review the contract with a Georgian lawyer.
A technical dispute and a legal dispute are two different things. An engineer determines the nature and possible cause of a fault; a lawyer assesses your rights and the procedure for making a claim.
When you need a specialist
Carrying out an inspection yourself gives you a general idea of the condition of the flat and allows you to note down any obvious issues. However, there are situations where the presence of an independent specialist – such as a technical expert, a structural engineer or a solicitor – is justified or simply essential:
- the flat is large or expensive, and the cost of making a mistake is high;
- The property is being handed over following refurbishment, involving a large number of elements to be inspected;
- during the inspection, traces of damp, cracks or other signs of serious defects were found;
- The building services must be inspected using professional equipment;
- you are outside Georgia and are unable to attend in person;
- you have no experience in construction and are not sure that you are interpreting what you see correctly;
- The condition of the property clearly does not comply with the contract, and we will need to have a serious discussion with the developer.
If you are unable to come in person, you may accept the flat through a representative. The representative’s powers must be duly documented and must enable them to carry out the necessary actions and sign the relevant documents. For information on how to complete the relevant document, see: ‘How to issue a power of attorney to buy or sell housing in Georgia“.
If you are in the process of choosing a flat in Georgia, it is best to consider the quality of the development, the specifications and the handover terms before signing the contract. Take a quick property search, so that The Residence can offer options tailored to your goals, budget and preferences.
Errors during acceptance
Many problems that arise after handover are exacerbated by a number of typical mistakes made by the buyer. They all have one thing in common: the buyer is in a hurry or underestimates the importance of the preparatory stage.
- Please come without the contract or any attachments. Without them, it is impossible to understand exactly what needs to be checked and against what the actual condition should be compared.
- View the flat in the evening or in poor lighting conditions. Traces of damp, uneven walls and flaws in the finish are easy to overlook under artificial light.
- Limit the inspection to a visual check of the finish only. Building services, ventilation, the balcony and communal areas are an equally important part of the inspection.
- Do not record comments in writing. Verbal agreements are much more difficult to use as evidence should a dispute arise at a later date. To ensure that remarks and commitments are admissible as evidence, it is best to set them out in writing and have them signed by both parties.
- Rely on verbal promises that the problem will be sorted out. ‘We’ll take care of everything’, ‘that’s our standard procedure’, ‘don’t worry’ — all of these should be backed up by written commitments.
- Start the repairs before documenting any disputed defects. Once renovation work has begun, it may become considerably more difficult to prove the property’s original condition.
- To regard the collection of the keys, moving into the property and the registration of the title as a single event. These are three distinct processes, and confusing them can lead to unexpected legal consequences.
- Use the Russian checklist word for word. Pre-sale agreements, Russian regulations, Rosreestr and Russian warranty periods — none of these apply to transactions in Georgia. Please refer to your specific contract and Georgian legislation.
What to check in the documents before signing
Before signing, please ensure that:
- the parties and the subject matter are correctly specified;
- the address, flat number and floor area correspond to the transaction documents;
- the date of the actual handover is correct;
- all comments identified have either been included in the relevant document or attached to it in a manner agreed by the parties;
- Appendices containing comments are identified as such and form part of the set of documents;
- you are clear about the next steps and the procedure for re-checking;
- You will receive your copy of the signed documents.
Do not sign a document whose contents you do not understand. If the wording could affect future requirements placed on the developer, it is advisable to seek legal advice before signing.
Checklist before signing
Please open this list just before signing the deed of transfer:
- You have the contract and its annexes, including the floor plan and specifications, in your possession.
- The inspection was carried out in daylight.
- All rooms have been checked, including the storage rooms, the loggia and the balcony.
- All the windows and doors opened and closed.
- The sockets, light switches, taps and drain have been tested.
- Ventilation has been checked at all designated points.
- The communal areas and the lift were inspected.
- All comments have been recorded in writing, complete with descriptions and photographs.
- You understand the status of a building’s commissioning.
- You have clarified the procedure and conditions for registering ownership following the signing.
- The procedure for rectifying defects (if any) has been agreed and set out in writing.
- You have received a copy of the signed certificate.
Key points before acceptance
The handover of a flat involves checking three things: the terms of the contract, the documents relating to the property and the actual condition of the flat. Don’t just look at the finishes: check the layout, the windows and doors, the building services, the balcony, the communal areas and the standard fittings.
Record all defects found in writing and with photographs before you begin your own repair work. If a defect requires technical assessment or if a dispute arises regarding the implications of signing the documents, consult the relevant specialist.
 Property in Montenegro
 Property in Cyprus
 Real estate in UAE
 Property in Bali
 Property in Thailand
 Property in Spain
 Property in Saudi Arabia
 Property in Turkey
 Property in Zanzibar
 +995 551 50 18 84
 hello@residence-estate.ge
 Georgia, Batumi, Sherif Khimshiashvili str. 1, office 1204



 Get catalogue of TOP-7 objects